Wow! This week has been moving fast. I haven't had time to really even breathe but today I did get my house completely clean! I will be posting pictures of the wedding I did in March and also will be writing a review on Simple Skincare, all of this is coming soon. It has been so hard getting back into my routine since coming back from Florida but I will get back to daily blogging very soon.
Thanks for all the understanding!
Wednesday, April 25, 2012
Thursday, April 19, 2012
Bronzed Face and Eyes Tutorial
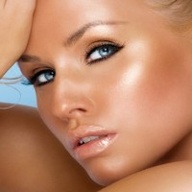
I want to give you guys a little tutorial on how to achieve that beautiful bronzed look for spring/summer. I really love using a cream matte bronzer and a pretty coral blush for the face. For the eyes I love a gold color to give your eyes a bronzed look. If you are pale you can still use gold and bronzer just in lighter shades so it isn't harsh on the skin. I'm going to take you step by step through the bronzed look.
First, Even out the skin tone with foundation and concealer. Use a shade of foundation that matches your skin and if you are concealing blemishes make sure that your concealer matches your skin tone. For under eyes use a shade lighter concealer.
Second, use a cream matte bronzer to contour your face. I suggest using the brozer in the hollows of the cheeks to bring out the cheeks bones and then contour from the bridge of your nose down to the nostril. Next, contour your forehead right at the temples. This will not only give your face some demention but some bronzed color as well. Then take a translucent powder to set the cream bronzer and foundation.
For blush I would use a cream blush in a coral or peach color and apply directly to the cheek bone. I apply with a regular foundation brush and then buff out with a blush brush. This will give your cheeks a beautiful sheen. You may or may not want to set this with powder blush depending on what look you are going for and your skin type.

Finish your lips with a nude or light pink lip for a very natural but sexy look.
Here are some products that may help you get that bronzed look:

Bare Minerals, Bronzed and Brilliant $32 at Sephora

NYX Cream Bronzer, $6.75 nyxcosmetics.com or Ulta

Urban Decay, Get Baked (Discontinued Palette) but you can find it on Ebay and also get these shadows individually.
Thursday, April 12, 2012
ELF Products Review
Hey Everyone,
I went to Target about 2 weeks ago and decided to pick up a few ELF products for review. I picked up the eyebrow powder, HD powder, black liquid liner, makeup setting spray, and an ELF brush. These products are very inexpensive so they are perfect for college girls or if you are just watching your beauty budget. I have really been a fan of the line for awhile now but I never got around to trying these products and as more of the line is being sold at Target I can really try a lot more from them. I picked specific products to see if they could be considered dupes for high end products from name brands like Smashbox, Makeup Forever, Urban Decay and Sigma.
I am happy to report that all of the products really passed the test for dupes I am especially happy with the brow powder which I consider a great dupe for Smashbox Brow Tech and Anastasia's brow powder and wax. The Elf Studio brow powder and wax really kept my brows looking great all day. I purchased the medium shade and it is a great shade for brunetts and maybe dark blonde. The powder actually comes in 4 shades for different hair colors but Target only had the medium which I found to work great even with my dark brown hair. This is a great buy for $3 you can't go wrong.
The ELF HD Finishing Powder I found to be a great low cost dupe for the Makeup For Ever HD powder. While the ELF Finishing Powder isn't 100% Silica like the Makeup For Ever HD Powder it is one of the main ingredients and I didn't find it to show up even on my tan skin. I felt this product was great if not better than the Makeup For Ever powder. The ELF Studio Packaging tends to be very big and bulky leading you to believe you get more product. They compare in amount of product rather well though the ELF powder has .28oz of product and the Makeup For Ever powder contains .35oz of product. The ELF powder is $6 compared to the Makeup For Ever powder that is $30 or the trial size that is $15. I found the ELF HD powder to be a big bang for your buck.
The next product I tried was the ELF liquid black liner. If you like Urban Decay's liquid liner you will really love these. They don't come in a lot of colors but everyone needs a basic black liner for a winged look. I was pleased that this liner didn't have a felt tip instead it is the old brush kind which is more precise and applies more product to give you are really great thin line. I prefer my liquid liner to be wet looking instead of matte and also to last a long time without flaking or smudging. This one did everything perfectly. This wonderful black liner was only $1 so if you are in Target any time soon pick it up and try it out I know you will really like it. I had to also try the ELF Makeup Setting Spray because I have been looking for a dupe for Urban Decay, All Nighter. I mainly want a dupe because the Urban Decay setting spray is $12 and that is for 1.7oz of product the large bottle is $30! That is a little expensive for this girl so I have been looking for something comparable and I do think that ELF has a good comparable product with their setting spray it was $3 for 3.5oz of product and it contained some of the same ingredients as the Urban Decay spray. I felt like it did a great job of setting my makeup and with the Tea Tree extract it helped keep my face feeling fresh. Perhaps not my favorite ELF product but for what it is, it works well!
Lastly, I want to mention the ELF brush I tried. I usually use Sigma Brushes, in my opinion I think they are pretty awesome and they have a wide range of brushes that are also priced well. I consider myself to be pretty picky about brushes I don't really like brushes that shed or are skimpy on the hairs. I have a couple different sets that I use for different things. I wanted to try out the ELF brushes because who could say no to spending just a $1 on a Detail Brush. I was a little skeptical but I found that the brush I purchased is pretty great. It is the Small Concealer Brush however, I don't like to use that to apply concealer I like to use it for applying a tiny bit of shadow to my inner corners and tear duct area to really open up my eyes and making me look more awake. I didn't stop there though this brush also works great as a liner brush and smudging brush. The brush is made of synthetic hairs just like any other concealer brush and the hairs don't shed. I was really impressed with this brush and I will be trying out some of their other face brushes to see if they work just as well.
I was very happy with all my ELF purchases I may have spent about $15 on all the products and that is really nothing for makeup products. I am looking forward to trying more from this line and see what new things they come up with. If you are in Target check this line out or if you like to buy online www.eyeslipsface.com is their website. The prices are the same at Target as they are online. The offer great prices and well pigmented products. I never feel like these products are cheaply made or that they can't stand up to the high end brands. I think that the more expensive brands should watch out for this line :).
Thanks for reading!
Tuesday, April 10, 2012
Hello From the Beach
Hey Everyone,
I just wanted to write a little post since I am here in our hotel relaxing before we head back out the the beach. I hope everyone had a wonderful Easter holiday! My daughter received 4 Easter baskets. She is mighty spoiled by all of our family. Anyway, I am really enjoying the nice weather down here not too hot and not too cool it is about 80 degrees here so perfect for the beach and the water seems warm too. I love these vintage inspired swim suites I bought one before we left home all I need to complete this cute vintage look is a big white floppy hat. It will also help protect my face from the sun! I am glad I packed my makeup bag light. I decided on tinted moisturizer, a bronze shadow palette, black liner, mascara, blush bronzer duo, and a Revlon lip butter. I have kept my hair up a lot so it has been pretty easy going.
I think if you are planning a beach vacation soon you should invest in a great tinted moisturizer one with SPF is even better. I really love the Smashbox BB cream (BB Cream is a tinted moisturizer) or if you are on a budget check out the ELF Studio Tinted Moisturizer ($3 available at Target). I have both and really enjoy them the Smash Box BB Cream dries to more of powder finish and you don't need to set it with a translucent powder to keep it from smearing all over your face. Just be sure not to wear too much makeup when heading outdoors because when the makeup interacts with sweat it can lead to breakouts or sometimes heat rash.
I am still trying out some of my ELF products I bought I will say that I am loving the brow powder best $3 I have spent in awhile. I won't elaborate too much since I will have a full blog post on all the products I tested and how they held up compared to their high end dupes.
Well time to hit the beach again! <3
Friday, April 6, 2012
Fresh Face Tutorial
I wanted to write a little fresh face tutorial just in time for Easter. This would be a great look to wear on Easter Sunday or even to work. The look can be accomplished in 5-10 minutes so enjoy!
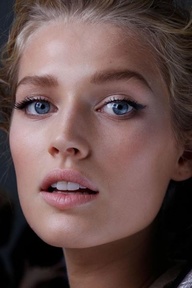
Fresh Face Tutorial
1.
Face: Choose a lightweight concealer and
foundation to even out skin tone and conceal blemishes. You can use a tinted moisturizer,
mineral foundation or take your favorite moisturizer and mix it with your
foundation to make your foundation have sheer to light coverage. Set the face with a light dusting of HD
powder
2.
Blush: take a blush brush and a blush color
(similar to the shade of your natural blush shade). Remember that rosy cheeks
make you appear younger and more youthful. Apply the blush slightly higher than
your cheekbones from the hairline to the apples of the cheeks. Keep a very
light hand and feather strokes. By applying slightly higher than your cheek
bones you give the appearance of a lifted face and higher cheek bones.
3.
Eyes:
To keep your make up looking light and natural define your brows with a
brow powder or pencil following the shape of your brow using light hair like
strokes to fill in sparse spots. Then apply a single natural and neutral shadow
on the lid. I like a cream color or a skin tone color that just gives the lid a
bit of definition. Smudge black or
dark brown liner into the lash line to give the lashes the appearance of
looking fuller and thicker but not looking like you have eyeliner. Curl lashes
and finish with a coat of lengthening/ mascara.
4. Lips: Finish with a pink or peachy toned lipstick one
that compliments your natural lip color and instead of applying from the tube
as you normally would, use your finger to dab on the color and give your lips a
very light touch of color. Then add just a little gloss to
the centers of the lips giving them a fuller effect. Press lips together and
you are done.
Enjoy!
Thursday, April 5, 2012
Oxy Clinical Buyers Beware

I felt the need to do a blog post on the Oxy Clinical Clearing Treatment product as it has completely burned areas of my face leaving them very swollen and irritated.
First, let me explain why I bought this product and if you have a similar skin type to mine you may want to steer clear of it. I have normal to dry skin in the winter but when the seasons change it tends to get more normal to oily also it is normal to sensitive I usually get unwanted blemishes on my chin and cheeks. Since the blemishes aren't full blown acne I usually get a benzoyl peroxide spot treatment to clear up the spots quickly. Since I have had no problems with 5% benzoyl peroxide products in the past I decided to give this one a try.
I purchased the product after doing a little research to make sure it didn't have any ingredients that I would be sensitive to and it didn't have any. I used as the instructions intended, it tells you to not use any other acne products with it because that could cause redness and irritation. I made sure to not use any other drying products or anything for blemishes with it. It also stated to avoid the sun or wear a sunscreen I decided to be on the safe side I would use this product at night before bed. I didn't have any reaction to it right away it didn't burn my skin or feel itchy. However, when I woke up in the morning I had red, blotchy, swollen burns on my face where I had applied the treatment. I will say that my skin is normal to sensitive and the product clearly says on the front that it is gentle for everyday use. It was not until I looked at the fine print of the packaging that says this product may cause redness, swollen skin, and irritation. WOW! so which one is gentle for everyday or so harsh it will burn your skin? I obviously now know the answer it is very harsh! I don't like to bash products because I am sure that for some people this would not burn or hurt their skin this way but if you have even the slightest bit of sensitivity you should not use this product. Additionally, this line is for acne prone skin but I would not recommend this treatment for anyone with acne as their face is already red and inflamed this product would make the problem that much worse.
Currently, I have a skin calming face mask on to help bring back moisture to my very dry burns and help with the burning sensation and swelling. I hope to hear back from the company and see what they have to say since the packaging is very misleading to any average person picking up what they think is a "gentle" spot treatment. This brand also makes a 10% Benzoyl Peroxide Spot Treatment I would be terrified to see what that would do to someone with the least bit of sensitivity. I guess there is risk in trying new products and this is par for the coarse but I am so glad I can bring you all my experience so that if you have skin similar to mine then you won't have to go through the bad experience. Oh and by-the-way yes my blemishes are now gone but very red swollen tender spots where they once were hmm not sure that was the result I was looking for.
I just received an e-mail back from the company it states:
Dear Amanda,
We acknowledge the receipt of your recent e-mail, and we regret that you did not find OXY® Clinical Clearing Treatment satisfactory.
We would like to assure you that great care is taken in the research and development of all of our products, and throughout the manufacturing process rigid control standards are maintained to assure that each product meets quality standards set by The Mentholatum Company.
It may be possible for you to be sensitive to any ingredient in this or any product. With the reaction you have had, we suggest you do not use this product again. Also, please check package labels before purchasing any other products containing these ingredients to ensure compatibility with the next product.
The Mentholatum Company guarantees its products and offers a refund for any unsatisfied customers upon proof of purchase. For a reimbursement, please send your store-identified receipt to The Mentholatum Company, 707 Sterling Park, Orchard Park, NY 14127.
We regret this product was not compatible with your skin.
Regards,
Well it was all very generic, I think a robot wrote this e-mail. I will be sending in my receipt though.
Tuesday, April 3, 2012
NYX Yellow Color Corrector
 |
Hey
Everyone,
I
mentioned on my Facebook page a week or so ago that I had just bought the new
NYX HD Color Corrector in Yellow. After using the product for over a week and
on several different skin types I am ready to share my review of the product
with you.
When
I saw this product in Ulta a month ago I was just a little skeptical even
though I always enjoy NYX products. I had previously tried the Physicians
Formula Mineral Color Correcting Concealers and really didn't like
them so when deciding if I should try this one out I was a little unsure. I
purchased it anyway considering if you purchase at Ulta and don't like the
product you can return it even if you have used it.
First off, the Yellow color
corrector is intended to brighten up the under eye area if you have bluish under eye circles, and covers mild redness. I used this on a multitude of skin tones during my product tests and on myself. I found it work well for so many different skin tones and really highlight the face even on lighter skin tones. On myself it gave me a great Kim Kardashian glow that you always see on her. If you are going for that glowing look and have light/medium to tan skin this will really work great on you. (For the same look on very pale skin try a pink undertone corrector and for dark/deep skin try an orange corrector).
I additionally used this corrector as a highlight to see how it would look. I dotted the product on my forehead, nose, and chin. It really gave a lot of light to my skin. Usually when you use a highlight it has a lot of shimmer and that can look somewhat unnatural if not applied correctly. This yellow corrector doesn't contain shimmer and when blended with your foundation gives a very natural glow. I recommend the NYX Yellow Corrector for anyone wanting to conceal blue tone under eye circles or get a great high light. Remember thought that with any corrector or concealer it does have to be set using a translucent setting powder otherwise it will be a mess on your face. Also you should blend this product in using a sponge or brush. I use a Sigma Precision Round Brush and a light handed stippling motion to blend in concealer and corrector under the eye area and a Sigma Synthetic Kabuki Brush for blending corrector and foundation all over the face using a stippling and buffing motion. This provides an airbrushed type finish.
This product gets my seal of approval. If you have further questions please leave comments below.
* This is an honest review and all the statements and opinions are my own. I nor Beauty Faces is affiliated with any of the above mentioned brands and I purchased these products with my own money. :)
Subscribe to:
Posts (Atom)